


Stainless Steel Flush Mount Single 50Amp Anderson Adjustable Bracket Grey KIT
$31.50
Availability: 34 in stock
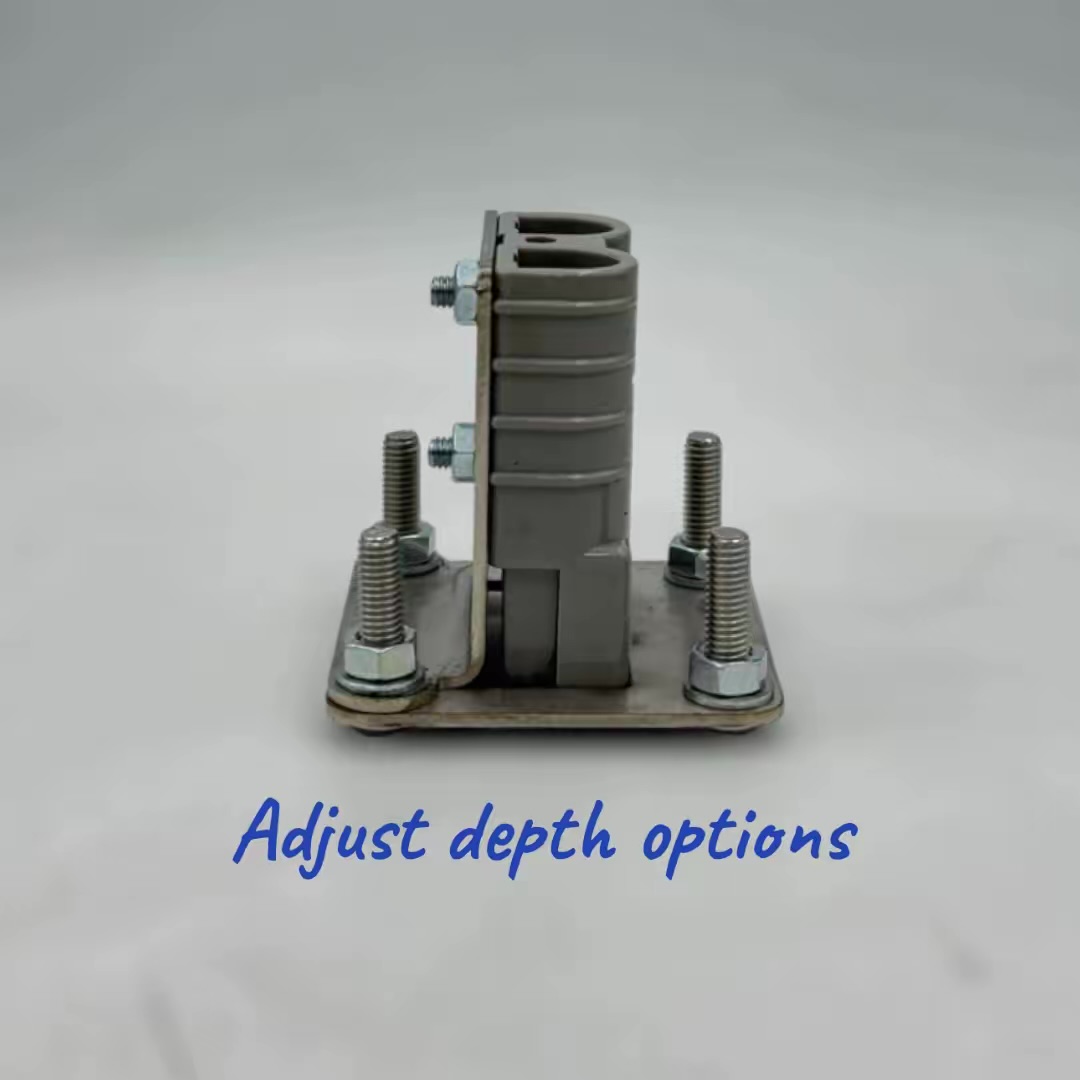
Stainless Steel Flush Mount Single 50Amp Anderson Bracket Adjustable depth
Single Anderson Mount GREY Kit:
Kit Includes:
X1 304 Stainless steel face place
X1 304 Stainless steel adjustable mounting bracket
X2 M4x20mm Stainless steel bolts (Anderson mounting)
X2 M4 Nyloc stainless nuts (Anderson mounting)
X4 M5 Button head bolts (Bracket mounting)
X2 M5 Penny washers (Bracket mounting)
x4 M5 stainless nuts (Bracket mounting)
x1 Genuine (Anderson Power Products) 50Amp Anderson Plug.
Please Note: This kit includes the Grey 50Amp Geniune anderson plug please see our other listing for kits that include Red or no plug
Different colored Anderson plugs will not plug into each other (ie: Blue must pair with another Blue red to red, grey to grey etc)
Specs:
- Face plate 50mm x 50mm
- Bracket depth min 48mm to 60mm with (13mm mounting surface material)
- (please note depth measurements do NOT include wiring provisions)
Fitting and assembly instructions
·Check where you intend to mount the Mounting plate that you have enough depth behind (not forgetting to allow for the wiring).
·Trace the 4 holes which will be used to mount your new custom bracket.
·Trace the one/two openings depending on if you purchased the single or double bracket (for the double you do not have to cut the two holes separate just cut the one large hole as the plate is the new front face.)
·Drill your x4 mounting holes (drill 5.5 or 6mm )
·Follow the bracket assembly instructions below.
·Now you have done the prep work on the location where you intend to fit your new bracket, time to assemble and wire up.
Your bracket will come disassembled, installation is fairly simple. The stainless pieces will have a protective backing simply remove the covered face, the covered side of the faceplate is protected as it is intended to be the front face (to be seen). The M4 x20mm bolts with the Philips head are for mounting the Anderson plug/or plugs to the adjustable mounting bracket, they are a tight fit through the Anderson plug, this is a deliberate design to minimise any movement, they will not push through, simply screw them through the Anderson plug, first place the Anderson plug with the flat surface facing the mounting plate with the connection side(of the Anderson plug) to the end with the bend on the flat side (bend folding away from the Anderson) and tighten the M5 nuts. As the brackets are designed to be adjustable to suit any mounting surface from 1mm – 13mm we have put 7 adjustable points (the slots) to adjust the depth of the Anderson plug to suit.
We recommend you do your wiring to the Anderson plug or plugs at this point as access may be difficult later. Sit the face plate on the outside of your mounting area and fit the x4 M5 Button head bolts through, slide the Anderson mounting brackets on now (again the bolts are a tight fit you may require to screw through), please note on the single Anderson version as there is only one mounting bracket required the kit contains x2 penny washers to use on the other two mounting bolts, tighten up and your done.
Note: Please refer to the photos provided as an installation aid.
Postage Information:
We recommend monitoring your tracking closely, as Australia Post does not always leave a card if no one is in attendance. If no one is available to accept a Signature on Delivery items, it will be taken to your local Post Office for collection.
To stay up to date with your delivery, we suggest downloading the free AusPost app. It provides real-time tracking updates, notifications, and reassurance that all info comes directly from Australia Post — not spam emails
| Manufacturer Part Number | |
|---|---|
| Brand |